Friday, November 14, 2008
Architectural Models

 Presentation model for Buddhist Temple of Chicago.
 Study model for house in Glencoe, IL.
Rapid Transit Cycleshop rehab
I designed floor and ceiling plans for a shop rehab...

 ...construction began, and after a month or so yielded:
 Note steel railings attached to floor that provide places for customers to lean their bicycles without upsetting displays or getting in the way of traffic flow. Hanging bicycle storage system optimizes volumetric space and allows easy access to merchandise.
 View from rear of shop showing color-coded ceiling racks for wheels of different sizes (top), central vise and grinder station (bottom center).
 Tensioned-cable adjustable front counter system I designed and built from leftover rehab construction materials and old workbench structures. Open design facilitates movement and traffic flow, and discourages the accumulation of materials extraneous to point-of-sale activities.
Graphics, Logos, Sketching

Show flyer.

Graphic developed for neighborhood art festival flyers, brochures, and t-shirts...
...and then the artists painted the wall, and the paint dried, and the people came and sat on the wall and watched the other people go by. Saturday in the park.
 Vignettes of urban scenes, Winter, 2002, Chicago, IL.
 Visualizations for proposed iconic bridge near grounds of old US Steel plant, Bush neighborhood, Chicago, IL.
Speculative Architecture
 Proposal for a mixed-income low-rise housing development on an old Chicago Public Housing site on the Near West Side. Plan features 226 units, each with private terraced outdoor space and access to common ground-level green space.
Floor plan detail, one and two bedroom units.

 Parkland redevelopment plan for ex-industrial site in Buenos Aires, Argentina. This parcel is one of about a dozen that were partitioned out of a much larger site (represented above in the street grid and built structure map overlaid with gradients of intended redevelopment activity intensity) for the sake of dividing the workload. The proposal envisions this linear, irregularly shaped area (hard line drawing below) s public space that's conceptually arranged much like a house, with adjoining areas progressing from most public to most private, giving visitors the option of participating in popular civic activities, or finding respite from hectic urban life in more secluded corners of the park. The surface planning suggests elements that encourage flow from one area to another, and ones that are intended to act as loci of cultural or pragmatic activity. The chart and images below detail the long-term ideals of the proposal.
 Using atmospheric visualizations and charts to map the proposed development, the designers focused more on encouraging the intended range of moods to be elicited as one progressed through the parkland than on determing every detail of the built environment. Providing visitors and nearby residents only with the means to establish an organic identity to the site, we created a design more of intent than of specificity.
The "Fixed and Fluid" icon proposes an ecological growth model for the site, suggesting a redistribution of biological, environmental, and cultural resources, dispersed in an organic method intended to allow a "natural" progression of development over time. The intent was to discourage the highly determined specificity many design projects produce, and focus the preponderance of specificity on the design attitude, and on research of solutions appropriate and specific to the idiosyncracies of the locale.
Wednesday, November 12, 2008
CAD hard line


 Designs and drawings for casework displays and mounting system for Under Armour flagship retail space: subcontracted for Structural Enterprises through Christopher Maylone Studio. Cases and structure were fabricated remotely and installed on site.
.gif)
Plans for recording studio live room at Flatts and Sharpe music store in Chicago.
+copy.jpg)
Theoretical high rise project plans.
+copy.jpg)
Details for above.
Tuesday, November 11, 2008
Sign and interior element fabrication
 Hand carved and finished sign: Alumilite panel with HDU sign foam letters, painted sides with gold leaf faces. Approx. 5' x 10' overall. (Christopher Maylone Studio)
 CNC and hand-carved sign, approx. 6' x 3', finished with epoxy and paint.
 (Christopher Maylone Studio)
 Room identification sign for health club in Chicago's West Loop. 3form, maple and sappelle wood, paint, epoxy, stainless steel hardware. Approx. 10" x 12". (Christopher Maylone Studio)

 Cabinets designed and fabricated for tenants in upscale boutique building. Cases are built of mitered and cemented 3form material, mounted with stainless cable and fastening hardware. Front (access) doors are acrylic. (Christopher Maylone Studio)
 Room identification sign for health club in Chicago's West Loop. 3form, maple and sappelle wood, paint, epoxy, stainless steel hardware. Approx. 10" x 12". (Christopher Maylone Studio)
 Cabinets designed and fabricated for tenants in upscale boutique building. Cases are built of mitered and cemented 3form material, mounted with stainless cable and fastening hardware. Front (access) doors are acrylic. (Christopher Maylone Studio)

Design for diffusing wall intended to protect valuable bird mounts in display case from light exposure damage. Finished product, fabricated by contractor, was simplified.
(Peggy Notebaert Nature Museum)
 Handmade CD/DVD cases: cherry, maple, sappelle wood, finished with shellac and paste wax.
(Christopher Maylone Studio)

 16' x 4' curved photo montage for Italian bistro in Evanston. Photos were digitally stitched together then printed, applied to a sheet of translucent polycarbonate, and mounted to custom made wood frame. (Christopher Maylone Studio)

 16' x 4' curved photo montage for Italian bistro in Evanston. Photos were digitally stitched together then printed, applied to a sheet of translucent polycarbonate, and mounted to custom made wood frame. (Christopher Maylone Studio)
Friday, November 24, 2006
Get in line

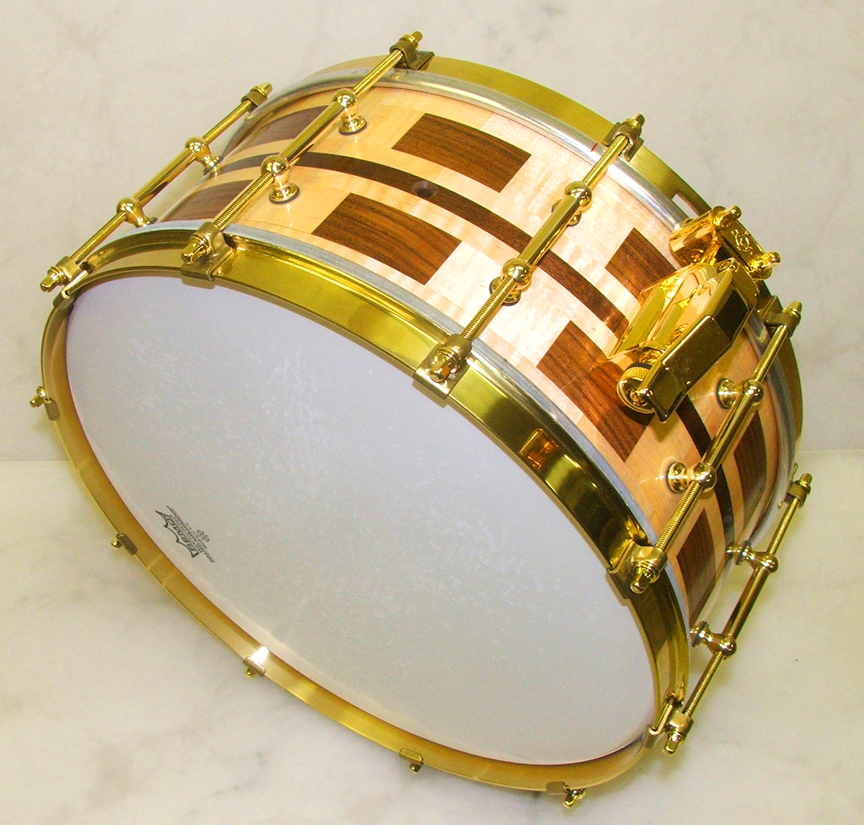

Here's another hand made snare drum. It's a maple and walnut affair.
There's pimpy brass hardware and a super fancy gold plated snare strainer, otherwise known as a throw-off. I don't like the word "throw-off." It sounds so crass. Not to mention that it isn't fitting of an instrument I would hope no one would throw anywhere. Do you like lots of double negatives?
This drum is not a negative. It sounds great. Nice high pitched, tight maple sound. Lovely overtones. I cut kinda deep snare beds for this one and haven't experienced any tuning issues.
This drum is not a negative. It sounds great. Nice high pitched, tight maple sound. Lovely overtones. I cut kinda deep snare beds for this one and haven't experienced any tuning issues.
Thanks for viewing! Y'all come back now, y'hear?
Wednesday, April 19, 2006
first snare
The saga of drum geekery:
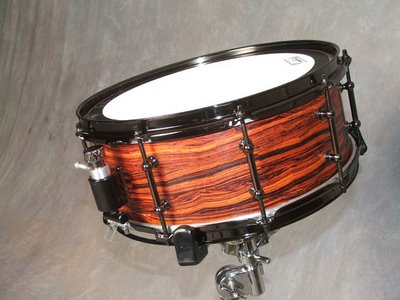
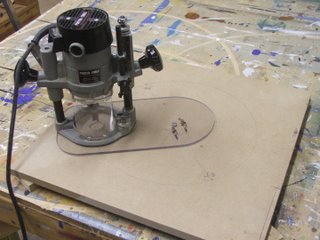 I've just built my first snare drum, and I've now posted my first blog entry. I think the drum's real perty. It's made of cocobolo wood, plus all the hardware I ordered from BestDrumDeals.com or some such clearinghouse. There's lots of pics here, and some explanation to boot. I've officially geeked out, as you'll see. In the pic above I'm preparing to route the outer diameter template.
 Outer diameter template routed.
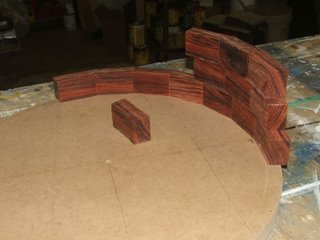 Test stack of shell segments. Sorry, forgot to photograph my table saw sled/jig which helped me miter and cut to length each segment. This is a 14" snare drum with 10 lugs, so I decided to use 20 segments per layer or course. Each piece is 2-1/4" long on the outside face, and each end is cut at a 9 degree miter.
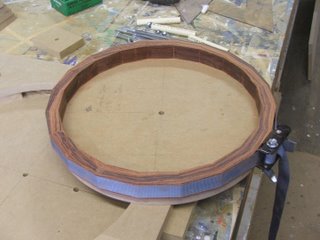 Gluing first course with band clamp. Although end-grain-to-end-grain glue joints are not strong, I needed some way of holding the segments together before gluing the second course to the first. The face grain joints that join each course to the adjacent ones are what really holds this thing together.
 Here I've routed one piece of the stackable platform I used to guide the router during machining operations.
 Closeup of segmented glue joints.
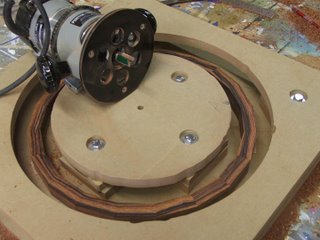 I used a flat pattern cutting bit to machine top surface of each course flat and parallel to its other face. Router base rides on top of MDF platform to maintain flatness.
 First course has been machined flat and circular. Second course sits on platform waiting for machining. I used high-tack double-stick tape, similar to turner's tape to hold each course down to the bottom of the platform during machining.
 Marking gauge I used to help me center the outer diameter template on the first course.
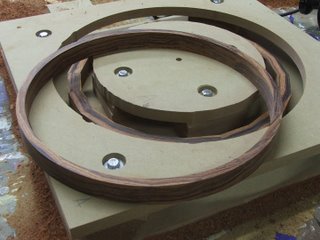
 First course, fully machined, glued to second course. Next I used a flush trim bit to cut the facets off the second course and cut it into a circle while following the contour of the first course. Thus each subsequent course maintained an accurate relationship with the one below. I continued this process for all five courses. If you look closely you might be able to see that I've staggered the "head joints" between the two courses.
 All five courses glued and machined.
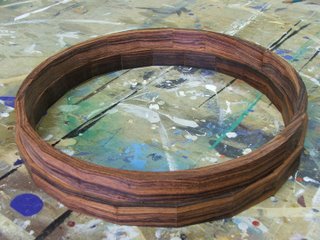
 Closeup of the bearing edge, a 45/45 degree cut, biased toward the outside of the shell. In other words, the edge itself is closer to the outside of the shell. This is the standard style of edge for modern drums, allowing fairly easy and accurate tuning.
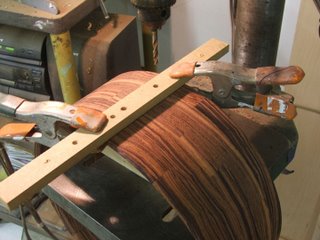 Jig for drilling lug holes. The tube style lugs I chose mount with two holes each.
 More lug holes.
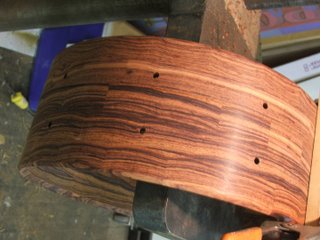
 Shell fully drilled and ready for final sanding and finish. I went over the whole shell with 320 grit paper, using sanding blocks shaped to the inner and outer profiles of the shell. Sorry, no pics. Maybe later. Not that interesting anyway. Just sanding.
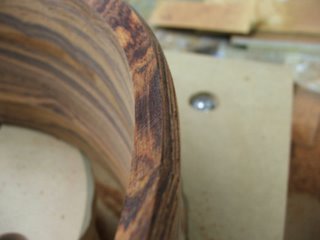
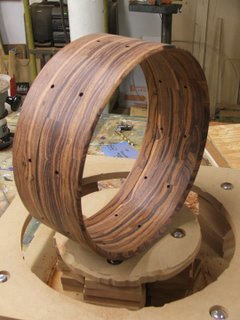
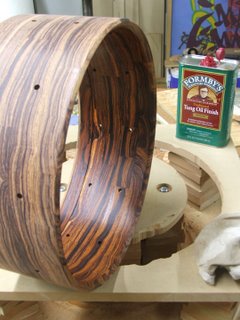 Inner shell surface with one coat of finish rubbed in. I chose a basic mixed tung oil and varnish finish from the hardware store. I don't have much patience for finish work and I figured this would look pretty good, considering the rather oily nature of cocobolo wood. It hardly needs a finish at all, but the oil helps to bring out the warmer reddish colors in the grain.

Fully assembled.
 Snare side.
 All dressed up and ready to rock. Such is the nature of geekdom.
 I've just built my first snare drum, and I've now posted my first blog entry. I think the drum's real perty. It's made of cocobolo wood, plus all the hardware I ordered from BestDrumDeals.com or some such clearinghouse. There's lots of pics here, and some explanation to boot. I've officially geeked out, as you'll see. In the pic above I'm preparing to route the outer diameter template.
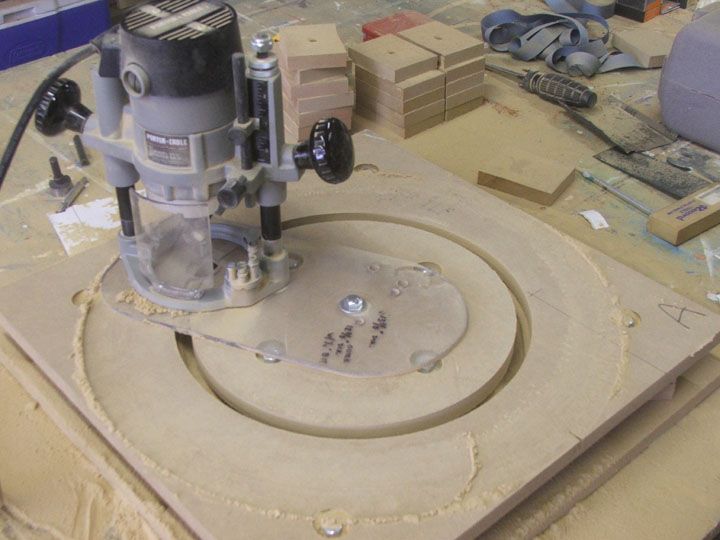 Outer diameter template routed.
 Test stack of shell segments. Sorry, forgot to photograph my table saw sled/jig which helped me miter and cut to length each segment. This is a 14" snare drum with 10 lugs, so I decided to use 20 segments per layer or course. Each piece is 2-1/4" long on the outside face, and each end is cut at a 9 degree miter.
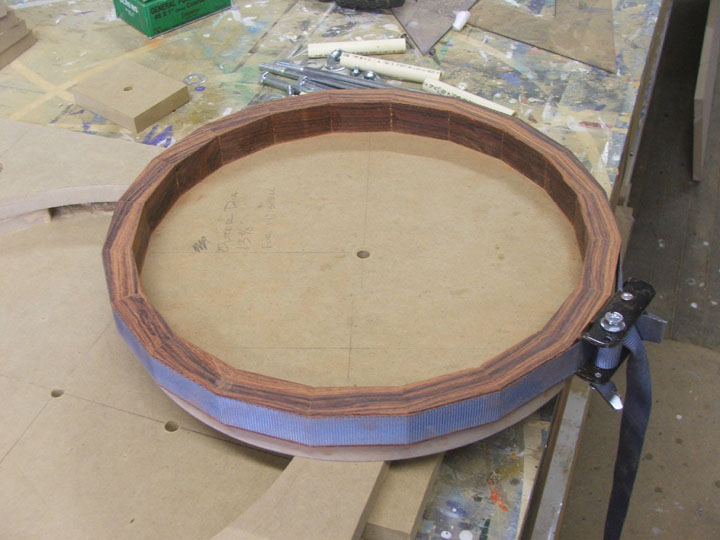 Gluing first course with band clamp. Although end-grain-to-end-grain glue joints are not strong, I needed some way of holding the segments together before gluing the second course to the first. The face grain joints that join each course to the adjacent ones are what really holds this thing together.
 Here I've routed one piece of the stackable platform I used to guide the router during machining operations.
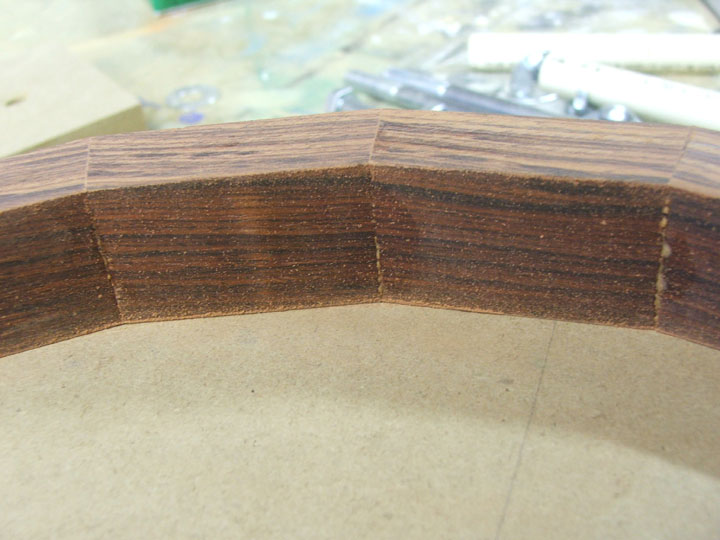 Closeup of segmented glue joints.
 I used a flat pattern cutting bit to machine top surface of each course flat and parallel to its other face. Router base rides on top of MDF platform to maintain flatness.
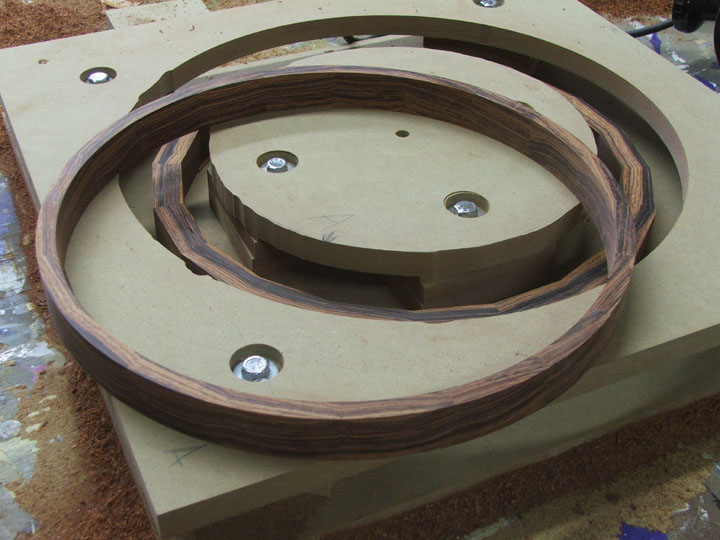 First course has been machined flat and circular. Second course sits on platform waiting for machining. I used high-tack double-stick tape, similar to turner's tape to hold each course down to the bottom of the platform during machining.
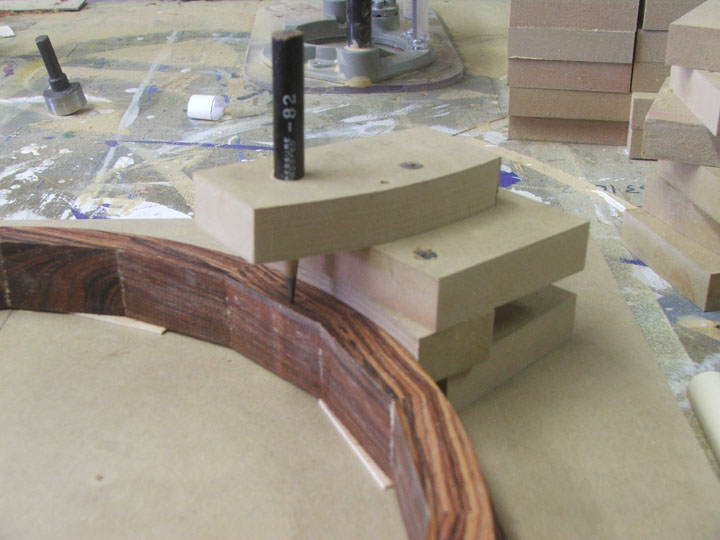 Marking gauge I used to help me center the outer diameter template on the first course.
 First course, fully machined, glued to second course. Next I used a flush trim bit to cut the facets off the second course and cut it into a circle while following the contour of the first course. Thus each subsequent course maintained an accurate relationship with the one below. I continued this process for all five courses. If you look closely you might be able to see that I've staggered the "head joints" between the two courses.
 All five courses glued and machined.
 Closeup of the bearing edge, a 45/45 degree cut, biased toward the outside of the shell. In other words, the edge itself is closer to the outside of the shell. This is the standard style of edge for modern drums, allowing fairly easy and accurate tuning.
 Jig for drilling lug holes. The tube style lugs I chose mount with two holes each.
 More lug holes.
 Shell fully drilled and ready for final sanding and finish. I went over the whole shell with 320 grit paper, using sanding blocks shaped to the inner and outer profiles of the shell. Sorry, no pics. Maybe later. Not that interesting anyway. Just sanding.
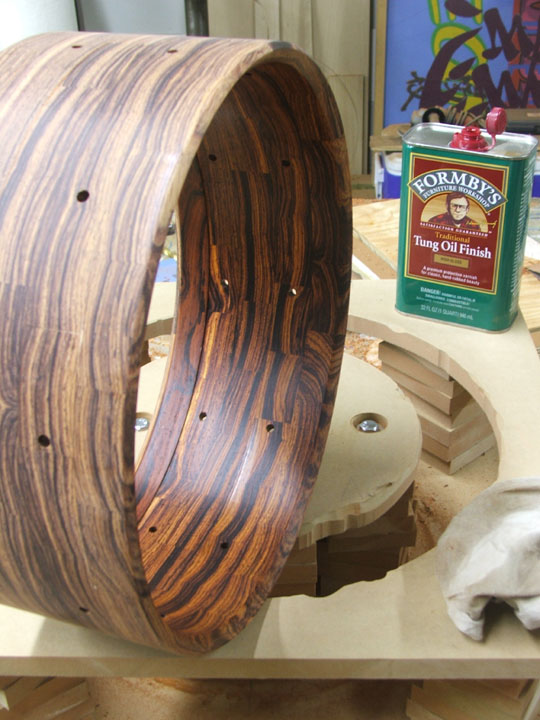 Inner shell surface with one coat of finish rubbed in. I chose a basic mixed tung oil and varnish finish from the hardware store. I don't have much patience for finish work and I figured this would look pretty good, considering the rather oily nature of cocobolo wood. It hardly needs a finish at all, but the oil helps to bring out the warmer reddish colors in the grain.
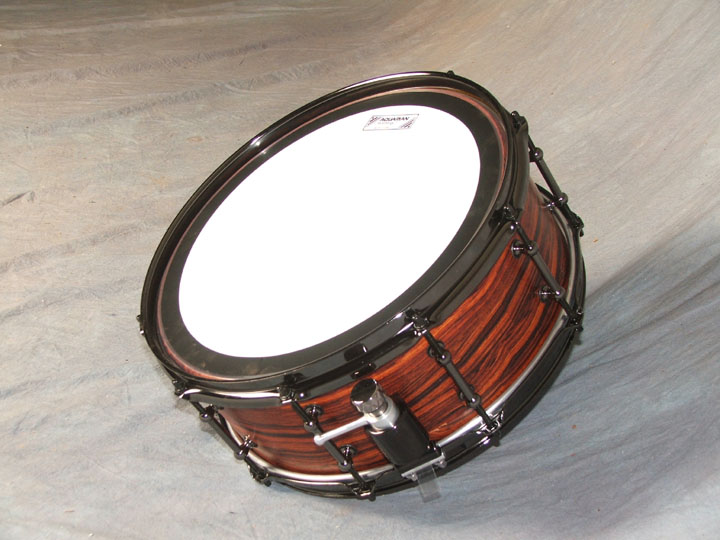
Fully assembled.
 Snare side.
 All dressed up and ready to rock. Such is the nature of geekdom.
Subscribe to:
Posts (Atom)
